Photobucket
Home       Relief Society       Family History       Emergency Preparedness       Food Storage       Canning       Gardening       Recipes       Share      
Showing posts with label alternate cooking sources. Show all posts

Thursday, September 6, 2012

How will you make that?


We have spent the past several months gathering food items in order to start, add to or replenish our food storage.  One other thing you might want to consider adding to any food storage plan is what method of preparation you will need. I recently discovered I could make a LOT of rice using my pressure cooker and only use 3 minutes of fuel instead of 20.  A bonus was I like the pressure cooker rice much better than my boiled rice.  Pressure cookers can be expensive but I recently saw one at Sam's Club for around $30.00.
In my disaster I like to think I will still have shelter, gas, electricity and water.  The reality is, I probably won't.  Using a pressure cooker will make the propane I have stored for my propane stove and oven go a lot further.
 - Patty W.
Presto 6-Quart Aluminum Pressure Cooker


FYI
You can order a Presto 6-qt aluminum pressure cooker from Walmart for $29.54
and if you prefer stainless steel they have a Presto 4-Quart Stainless Steel Pressure Cooker for $40.54

Here's the recipe Patty uses to make rice


Basic White Rice (makes 3 cups)
1 T oil or butter
1 C long-grain, basmati, or converted white rice
1 1/2 C water
1/2 t. salt, or to taste
Heat butter in 4 qt. or larger cooker.  Add rice and stir to coat with the butter or oil. 
Stir in water and salt.  Lock lid in place.  Over high heat bring to high pressure. 
Reduce the heat just enough to maintain high pressure and cook for 3 minutes. 
Turn off heat.  Allow presure to come down naturally. 
Remove the lid, tilting it away from you to allow steam to escape. 
If the rice is not quite tender, replace the lid and steam in the residual heat for a few more minutes.  

Friday, May 25, 2012

Hot deal on Charcoal - get it? - "HOT" deal

OK I'm not funny, but I have been up most of the night with a sick kid.

 I just wanted to pass along this great deal on charcoal at Home Depot.

13.9 lb. Original Charcoal Briquettes (2-Pack)

Kingsford 13.9 lb. Original Charcoal Briquettes (2-Pack)  for $5.88


Stocking up on charcoal is a nice way to keep out of the kitchen this summer, and it's not a bad addition to your food storage either . . .

 You can use all of this charcoal it brush up on your Dutch oven skills.  Don't have any skills?  You might like to check out Scouting Magazine.org's Dutch Oven 101 

Tuesday, April 24, 2012

How to Make a Wonder Box / Oven

It's starting to get warm out - yippee!
Shopko had a sale on their bean bag filling.
The fates have aligned it's time to try out a Wonder Box.  (A big bean bag like box that you put hot food in and let it cook for the next few hours using the retained heat)  *can also be used to keep cold food cool - think camping with ice cream.
I have looked at several different tutorials from very basic sew pieces together to ones with zippers and straps, I bet you can't guess which one I'll be using?

Right - simple

I really liked these tutorials because they had pictures and that seems to help me.  iwillprepare.com Cooking without electricity - Wonderbox and The Thermal Cooking Weblog  and Building a Wonderbox at Food Storage and Survival these sites have a lot of information if you are interested in different ways of cooking without electricity I would definitely check them out.

The hardest part for me was making the pattern from their instructions so I took a bunch of pictures but really if you are in the Kanesville area and just want to copy mine, leave a comment or send me an e-mail  and we'll work that out.


I tend to be a bit on the messy side so you'll probably have better luck with this . . .I did have several small people to help me clean up though.  BEST part of the process was when one of our little friends saw the mess and  informed me that I had made the mess and I had to clean it up.  I guess her Mom is teaching her well.


My Wonder Oven with cans stored inside
Using a pitcher is definitely easier and lets you follow the recommended amount instead of just guessing (The reason why I unpicked mine, added more filling and resewed - not so much fun!)


Trial and Error 

1st attempt - brownies - FAIL, I followed the instructions for muffins but they never cooked, just got to that nice warm gooey consistency (overnight) and then I put them in the oven.  *I may not have filled my bag full enough - need to experiment some more!  UPDATE After attending a class on wonder oven cooking at the community preparedness fair I've learned that I need to cut back on the water in my brownies (and cakes too) so I'll be trying that one again.  As soon as the treat supply in the house goes down.
      EDIT 4/26 - I tried the cake with less water and even after boiling for 10 minutes and cooking for 4 hours TWICE it was still goopy, if you do try this and have success please leave a comment, I'd love to have this work.


2nd - attempt - rice (I wanted something that I knew would work) - PASS (but I prefer the rice cooker).  I added 2 cups of white rice to 3 cups boiling water and boiled for 5 minutes than put the whole pan (lid and all) into the wonder oven and left it for 2 1/2 hours.  The recipe said 1 1/2 to 2 hours so this might have been part of the problem.  The rice was good, but had a slight crunch (like it wasn't almost but not quite done) and the bottom of the pan was a little soggy (like it was over cooked).  Next time, less water, less time.  UPDATE - from the class, she said I should only boil the rice for one minute.

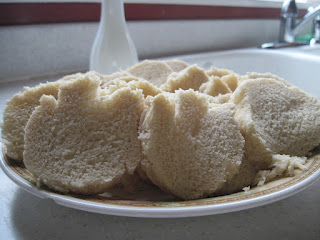
3rd attempt - bread- PASS, My super picky 5 year old loved it, it was like crustless Wonder bread, really soft and moist.  I did have to make it in soup cans because I didn't have any larger ones but I'll be remedying that soon.  I made a regular white bread recipe and let it rise once (but I was using quick rise yeast so I'll probably skip that next time, then I put the bread into soup cans that I had sprayed with cooking spray.  I filled it about half full and let the dough rise to close to the top of the can.  Then I covered it with foil and used an elastic band to hold the foil on.  The cans went into my big pan, then I added water up to about 2/3 of the cans height.  I had a problem here because my cans wanted to float so I jammed in two more soup cans of dough.  I boiled the water for about 10 minutes (with the lid on) and then transferred  the whole thing to the wonder oven and put the cover on.  I cooked for 2 hours and was done.
first attempt -need to spray the cans better not so pretty but tasty

Wonder oven bread slices, no crust
Just out of the Wonder Oven, in time for lunch, it's still VERY hot
       Second Try - at bread - I bought some larger cans, greased them well and voila - another success


One vegetable juice can and one spaghetti sauce can perfect for my pot
Wonder Oven bread, still looks nicer sliced
                      

3rd Attempt - Hamburger Soup - PASS  - This was a use up the leftovers, soup and because it's hot out and I didn't want it simmering on the stove the wonder oven was a good idea. I did brown the hamburger in the same pot I boiled it all in.  I won't list the ingredients because although it worked, it didn't taste good, I used rice and that was great, it only boiled for a minute so I guess that is the trick.  I should have used more liquid than I did (all I used was a 46 oz. can of vegetable juice but with a cup of rice that definitely wasn't enough).  My main problem (and this is not at ALL uncommon(for me) is that I turned it on high to boil and burnt the bottom so it tasted burnt).  Next time . . . It was really nice to have it nice and hot at dinner time without adding any heat to the kitchen.


Some helpful websites:
Food Storage and Survival - Recipes for stew, oatmeal, rice, chicken and other meats
My Year Living on Food Storage - Making bread in a wonder oven
Eco Wonder Oven - Lots of recipes; oatmeal, rice, vegetable, pasta, meats, muffin, bread, jam, yogurt, carrot jam
 My Food Storage Cookbook  Really detailed instructions  with pictures for making bread, muffins, yogurt, tamales, lasagna, overnight oatmeal, arroz con pollo, chicken cacciatore with herbed polenta,
This one contradicts some of the info I received at the Community Preparedness Fair, so there is definitely some trial and error involved, probably depends on the pan you use, how strict you are with measurements etc. and of course the construction of your wonder oven.

WHAT I LEARNED (Community Preparedness Fair) - unfortunately they don't have a website  but you can check out part of the presentation on you-tube or e-mail with questions wonderoven@ymail.com  They do sell pre-made Wonder-ovens with a container and a DVD, if you'd rather not attempt making your own.  She was very kind to share her knowledge at the class (and some yummy samples too).

Rice - boil for one minute with less water, she didn't share ratios but I think my 3 cups boiling water to 2 cups white rice is probably OK (maybe a bit more for brown rice).

Chicken - cut breasts in half (add seasoning-optional), put in an oven bag or she used Ziploc steamer bags and put in pan of water (don't cover the top of the bag, especially if it's vented, I've also read that you can stick the top of the oven bag outside of the lid) bring the water to boil, when boiling, boil for 12 minutes, with the lid on.  Transfer the whole pot to your wonder oven and cook for 2 hours.

Other meat  - Similar to chicken, she said with a 3 lb. roast, she will at least cut it in half and I think she said to boil it for 12 minutes and then let it cook in the wonder oven for 2 hours, but here's another post from someone else she introduced to Wonder ovens. My Food Storage Cookbook all about cooking meat in the Wonder oven.

Beans - soak overnight, season, boil for 15 minutes, add millet and carrots to help with the gas beans produce and put the whole pot, lid and all into the wonder oven for 5 hours.

Stew - boil for 10 minutes - wonder oven for 2 1/2 hours

If you forget and leave anything too long don't worry - IT WON'T BURN - just don't leave it so long that it cools down and on that note don't put anything in the Wonder oven that's not really (like boiling) hot or really cold or you're going to have some yucky things growing there.

As I've been experimenting I keep finding myself coming back to check out different post to see how to do something or how long so I made this little cheat sheet combining a few of the things I've learned.  I hope it helps you.

printable quick tips
  

Wonder Oven Quick Tips

Bread -
Raise to within 1 inch of top of can, cover can with foil, secure with elastic band,
put in pot with water 2/3 of the way up the can.  Boil with lid on 10 min.  "Bake"  2 hours

Brownies / Cake
Decrease water (ex. 1 1/2 cups down to 1 cup),
Boil (in can like bread) Boil 10 min.  "Bake" 3 - 4 hours
    ** I have not had success with this . . .

Chicken -
Boil in bag 12 minutes, "Bake" 1 to 2 hours

Dry beans -
soak overnight, boil 15 minutes, "Bake" 4-5 hours

Meats -
Brown meat, Boil in bag 12 minutes, :"Bake" 2 hours, if you've cut it up
For a whole roast, "Bake" 3-4 hours *5-6 hours if it's really big

Meatloaf -
boil 15 minutes, "Bake" 4 hours

Muffins -
In a can like bread, boil 10 minutes "Bake" 3 - 4 hours

Oatmeal
Boil 1 - 2 minutes, add dried fruit,
"Bake" 1 -2 hours or overnight, to really plump dried fruits

Rice -
decrease water 3 to 3 /12 cups water to 2 cups white rice,
3 1/2 to 4 cups water for brown rice boil 1 minute, "Bake" 2 1/2 hours
or boil 10 min - "Bake" 40 min,
or boil 5 minutes - "Bake" 1 1/2 hours

Soup / Stew -
Boil 10 min, "Bake" 2 hours (add extra liquid)

Vegetables -
Potatoes or root vegetable can be boiled in their skin
Or can be cut up and put in bag, boiled 5 minutes"Bake" 1 - 2 hours
Hard winter squash, boil 10 minutes"Bake" 1 -2 hours

Bags to use -
Crisp bags (like the ones in a cereal box)
oven bags
Steamer bags Ziploc makes one
Cans to use -
The gold lined cans (spaghetti sauce, some fruits)
work well, don't use the pop top cans they leave a rim.

Thursday, August 11, 2011

Cooking with Propane


In my emergency there will always be electricity, gas and water. Since “emergency” means you probably won’t have one or more of the before mentioned items, I needed to look for other sources of cooking.

 I have learned how to make a whole wheat bread I really like and have figured out how to grind the wheat and prepare the dough without gas or electricity, but didn’t know how I was going to bake it. We recently purchased a propane stove/oven combination. It worked GREAT! I was able to put three loaves of bread in the over and cook them in 30 minutes using a small canister of propane (a small container of propane has the equivalent of 7 hours of fuel). Except for a few areas that burned because they were covering the openings that let the heat into the oven, the bread was perfect. I could put only two loaves in the oven and avoid this area or easily cut the burnt part off the bread. I am going for three loaves instead of two

We purchased this outdoor camp at Sam’s Club for $180.00. They also had 4 canisters of propane for a little over $10.00. This oven also has 2 burners on top for cooking other dishes. It is easy to use and store. I highly recommend it.

Sunday, July 17, 2011

Dutch Oven Chicken Enchiladas

We went camping this past week and this time we decided to vary the hot dog, sandwiches, hot dog routine and I tried a new recipe.  This was nice because the ingredients were things I normally have on hand.  I did have to buy sour cream, but I'm thinking of investing in powdered sour cream, at least for baking.  Anyone have any suggestions on what brand to buy?

I found the original recipe on the Internet on a site called grouprecipes.com and modified it a bit.

Ingredients
2 pints, canned chicken (the original called for 1 chicken, boiled and boned)
1 - 2 cups chicken broth (I just used the juice from my canned chicken).
1 small can chopped green chilies
1 can red or green enchilada sauce (I used red)
2 cans cream of chicken soup (the original used 1 can cream or chicken, 1 can cream of mushroom, but because my family complained I quit storing cream or mushroom).
1 cup sour cream
dash of onion powder (I forgot it and it was still good so . . . .)
1 lb. grated cheese ( I used some from my freezer that was a pizza blend - I think - cheddar and mozzarella)
   * word to the wise - when freezing grated cheese store in sandwich or quart sized baggies not gallon sized ones, unless you are going to freeze it on a pan and then put it in the baggies.
12 flour tortillas.


Combine first 7 ingredients and 1/2 the cheese in a pan and heat until the cheese melts/  ( I did this but I'm not sure it's necessary, especially if you are adapting this for a regular oven.)
Layer tortillas, cream mixture and cheese, repeat until you use all of the tortillas.


I did 3 tortillas, mix, cheese, 3 tortillas, mix, cheese etc. ending with tortillas and just cheese for the top layer because I like crunchy tortillas.

I used a dutch oven liner for the first time and LOVED it, no clean up!


Bake 30 minutes with about 10 coals on the bottom and 12 on top (350 degrees).

printable recipe

I was not in charge of the coals so I think we used more.  The top was nice and crispy though and most loved it.  (I have picky kids so if everyone loved it I would be in shock).  We ate it with corn chips, also from food storage.

Tuesday, June 28, 2011

Alternate cooking sources

Are you interested in having an alternate cooking source?  There are are  many different options to chose from, here are just a few.   I know there are many other ideas please share your favorites (leave a comment or e-mail me and I will post them).

  • The wonder-box  also known as a hay box or retained heat cooker is a good way to conserve fuel but you still need to be able to heat it up on something else first.  These links have some ideas, patterns and recipes if you are interested.


  • Let's not forget one of my favorites, Dutch Ovens, for some more information you can check out Chuckwagon Supplies a business owned by a former member of our stake and a great dutch oven cook
  • FEMA suggests  that alternative cooking sources in times of emergency include candle warmers, chafing dishes, fondue pots, or a fireplace.
    • Charcoal grills and camp stoves are for outdoor use only.
    • Commercially canned food may be eaten out of the can without warming.
    • To heat food in a can:
      1. Remove the label
      2. Thoroughly wash and disinfect the can. (Use a diluted solution of one part bleach to ten parts water.)
      3. Open the can before heating.

Thursday, April 28, 2011

What else besides food?

Have you ever thought about what you might like to have on hand should you not be able to go to the store for a few days, weeks or even months?  These things are easy to add to our basic three month supply, usually store well and last quite a bit longer than most food items.  Some of them definitely go on my list of  "have to haves".

Here's a list of some things to think about:

  • Wheat grinder (electric and hand operated, in case of no electricity)
  • Hand crank blender
  • Towels/rags (paper and cloth)
  • Plastic wrap/aluminum foil
  • Recloseable baggies
  • Plastic containers with lids (butter bins, etc.)
  • Dish soap, laundry detergent
  • Favorite spices (rotate annually)
  • Condiments such as ketchup, syrup, jelly, etc. (rotate annually)
  • Garbage sacks
  • Alternate cooking source (you may want to try making a wonder box - for information on what it is and how to make one you can check out these sites: Wonderbox pattern  Cooking with the wonderbox

  • Toilet paper, tissue, enzymes (for portable toilets)
  • Portable toilet, privacy shelter
  • Shampoo and lotion, deodorant
  • Soap (soap bars last the longest)
  • Toothpaste, extra toothbrushes, dental floss
  • Feminine hygiene products
  • Razors, shaving cream, extra blades
  • Medicine, contact solution or extra glasses
  • First aid kit and individual first aid items

  • Garden seeds (several cans for replenishing or exchanging)
  • Water barrels, siphon pump, portable water containers
  • Activity games, cards, paperback books
  • Old clothes for outside labor
  • Water filter for replenishing your water supply
  • Wonder Washer (hand operated clothes washer)
  • Candles, lantern, or other light source
  • pet food
  • bleach or other cleaners
  • hydrogen peroxide
  • rubbing alcohol
Beyond just being prepared in the event of an emergency I find that I save money by buying things in advance.  I can watch for sales and then I don't end up making those "hurry up" trips to the store because we are out of toothpaste, tp or shampoo.  Having a few extra medicines on hand can really save the day as well and if you have babies or babies visiting you, it doesn't hurt to have a nice stash of diapers, wipes, rash ointment and formula or cereal.  If you don't end up needing these things there is always someone who will.