Photobucket
Home       Relief Society       Family History       Emergency Preparedness       Food Storage       Canning       Gardening       Recipes       Share      
Showing posts with label Kristi H. Show all posts

Friday, July 19, 2013

Recipes for the dehydrator

TOO HOT TO COOK!

Here are some dehydrator recipes to try out.  If I can muster the energy, I'll make some of them and post pictures and my families review.  If you happen to make them please let me know, I'd LOVE to share your experience, comments, suggestions, pictures whatever you have.

Thanks, 
Kristi

Apple Pie with Cheese Roll-Ups
4 apples, peeled cored and chopped
3/4 cup pecans, ground
1/2 cup cheddar cheese
1/2 tsp. cinnamon
1/2 tsp. nutmeg
In a blender mix all ingredients until pureed. Pour onto solid fruit leather sheets; dry at 135º for 4 to 8 hours, or until leathery. Remove from sheets while still warm. Let cool slightly. Roll in plastic wrap and store in dark , dry cool place or in the freezer.
 
Orange Julius Roll-Ups
1 1/2 cups applesauce
1 small apple, peeled, cored and chopped
2 tsp. dried orange ground
1 1/2 tsp. vanilla
In a blender mix all ingredients until pureed. Pour onto solid fruit leather sheets; dry at 135º for 4 to 8 hours, or until leathery. Remove from sheets while still warm. Let cool slightly. Roll in plastic wrap and store in dark, dry cool place or in the freezer.
 
Easy Fruit Rolls
1 jar any flavor applesauce (used as the base of the fruit roll)
You can flavor your fruit rolls with fresh pureed fruit, powdered flavored gelatin, or with coconut or nuts. (Get creative!) Just mix it in or sprinkle on top before drying.
Spray a fruit roll sheet (lightly) with any type of cooking spray. Place several tablespoons of applesauce on a fruit roll sheet, to make small roll-ups. Spread to 1/4 thickness, so they’re about 4" in diameter. You can fit 6-8 on a fruit roll sheet, depending on how large you make them. Place in tray of dehydrator. Dehydrate at 140° for approximately 5-7 hours or until top of fruit roll is tacky. Remove, roll-up and place in a zip-lock bag.
NOTE: Entire fruit roll sheet may be covered with applesauce mixture and then dehydrated. Cut into individual serving sizes.

Applesauce & Fruit Roll-Ups
3 cups strawberries
3 cups applesauce
or
2 cups bananas
2 cups applesauce
In a blender mix all ingredients until pureed. Pour onto solid fruit leather sheets; dry at 135º for 4 to 8 hours, or until leathery. Remove from sheets while still warm. Let cool slightly. Roll in plastic wrap and store in dark , dry cool place or in the freezer.
 
Tropical Roll-Ups
6 ripe bananas, peeled and cut into pieces
1 orange, peeled and quartered
In a blender mix all ingredients until pureed. Pour onto solid fruit leather sheets; dry at 135º for 4 to 8 hours, or until leathery. Remove from sheets while still warm. Let cool slightly. Roll in plastic wrap and store in dark , dry cool place or in the freezer.


Harvest Granola
5 cups rolled oats
1 cup raisins
1 cup pecans or almonds, chopped
1/2 cup wheat germ
1/2 cup dried apple, chopped
1/2 cup dried dates, chopped
1/2 cup sesame seeds
3/4 cup brown sugar
3/4 cup margarine or butter, melted
1/2 cup honey
1/3 cup oil
1 tsp. cinnamon
1 tsp. vanilla
In a large bowl, combine all ingredients, mixing well. Spread onto solid dehydrator sheets and dry at 145&3186; for 3 to 5 hours or until crunchy. Store in an air-tight container.

Granny Smith Granola
3 Granny Smith Apples
2 cups quick-cooking oatmeal
1/2 cup silvered almonds
2 tbsp. brown sugar
1 tbsp. honey in 1/4 cup water
1 tsp. salt
1/2 tsp. cinnamon
Quarter, peel and core apples; Coarsely grate. Place in a bowl with the other ingredients and toss lightly until thoroughly mixed. Place mixture on solid dehydrator sheet and dry for 2 to 3 hours, or until crunchy. For a more tender granola, add 1/4 cup vegetable oil before drying. Store in an air-tight container.

Apricot-Raisin Granola
4 cups rolled oats
1/2 cup oil
1/2 cup brown sugar or honey
1/2 cup sunflower seeds
1/2 cup sliced almonds
1/2 cup dried apricots, chopped
1/2 cup raisins
In a large bowl, pour oats; add oil and brown sugar and toss lightly until blended. Add sunflower seeds and almonds. Mix well. Spread on solid dehydrator sheets 1/2" thick. Dry at 145º for 4 to 7 hours, or until crunchy.

"Butterfinger" Bites
2 cups coconut
2 cups dried apples, peeled, cored and chopped
2/3 cup peanut butter
1 1/2 tbsp. vanilla
In a large bowl, combine all ingredients; mix well. Shape into 1/2-1" balls. Dry in your dehydrator at 135º for 4 to 5 hours, or until firm and crisp on the outside.
Makes about 3 dozen.

Texas Chili Peanuts
1(16 oz.) jar dry-roasted unsalted peanuts
1/2 cup water
1/4 cup hot pepper sauce(like Tabasco)
1 1/2 tbsp. chili powder
1 tsp. ground cumin
1/2 tsp. red pepper
1/8 tsp. ground oregano
Place nuts in a 9-inch square pan. In a glass measuring cup combine remaining ingredients. Pour over nuts. Let nuts sit at room temperature overnight. Drain liquid from nuts; place nuts on regular drying tray. Dry in your dehydrator at 145º for 3-5 hours or until nuts are crunchy. Store in an air-tight container.

Yogurt Drops
Thicker brands of commercial yogurt dry best. Drop flavored yogurt by 1/4 teaspoon onto lightly oiled Fruit Roll Sheet. Optional: for fun sprinkle drops with chopped peanuts or coconut before drying. Dry in your dehydrator 8-16 hours at 135° until chewy. Remove from sheet while warm. Chill and store in refrigerator or freezer.

Taco Chips
1 cup whole kernel or creamed corn
1 cup sharp cheddar cheese, grated (the ready grated cheese is not as satisfactory)
1/2 cup red or green peppers, diced
1 TB onion, chopped
1/8 tsp cayenne pepper
1/2 tsp chili powder
Salt to taste
In a blender or food processor, blend together all ingredients at high speed. Spread mixture thinly onto Fruit Roll Sheets. Dry in your dehydrator at 130° for approximately 10 hours or until dry on one side. Lift entire corn ring off of Fruit Roll Sheet, turn over and dry in your dehydrator for two hours longer or until crisp. Break into pieces.

Au gratin Potato Chips
3 cups potatoes, peeled, boiled and mashed
1 1/2 cups sharp cheddar cheese, grated
1/2 cup Parmesan cheese, grated
1/2 tsp. salt
Put all ingredients in a blender or food processor and mix. Spread onto solid sheets and dry in your dehydrator for 4 hours. With a clean butter knife, lift entire ring off sheet, turn over and dry for 1 hour longer, or until dry enough to break into pieces


Date-Fig Balls
1 cup dried dates
1/2 cup dried figs
1/2 cup prunes
1/2 cup raisins
1 cup crushed walnuts
1/2 cup sunflower seeds
3 tbsp. lemon juice
1 cup coconut
In a food processor or food grinder, finely grind dates, figs, prunes and raisins. In a medium bowl, mix ground fruit with nuts and seeds. Stir in lemon juice. Shape into 1/2-1" balls. Roll in coconut. Dry in your dehydrator at 135º for 4 to 6 hours, or until crisp on the outside.
Makes about 30 balls. 

Don't have a dehydrator,   This could be made in the oven as well.  Here's a link to some made in a 200 degree oven.  I imagine you could do these recipes the same way.

Friday, March 2, 2012

Making a using your own yogurt and cream cheese

I've been experimenting with making my own cream cheese (actually I think it would be called yogurt cheese) anyway I made some yesterday and then Patty e-mailed me her recipe for cream cheese brownies and NATURALLY I had to try them.  Despite the fact that I had to take them out of the oven twice (yes twice) because I used the wrong size pan and then forgot the chocolate chips (hard to believe right?!) they smell delicious!

If you are interested in making your own yogurt, Greek yogurt, cream cheese, sour cream, ricotta cheese you might want to click on some of these links.

I used this one to make the yogurt
A Year of Slow Cooking:  You can make yogurt in your crock pot
and got the idea for Greek yogurt from here:
Apron Strings:  How to Make Your Own Greek Yogurt (Good News - It's a Cinch)
How to convert it to sour cream and cream cheese here:
Savvy Sister Shops:  Use your powdered milk to make yogurt, sour cream and cream cheese
This is a great one about making your own yogurt / cream cheese (that I should have re-read before making mine)
Made by Lex:  Making your own cream cheese couldn't be easier


Let me give you just a brief run through of what I actually did, how it turned out and what we are using the stuff we made for.

First the yogurt
7:30am - put 6 cups of 2 % milk and 1/2 cup powdered milk in the crock pot on low

10am - turned the pot off

1pm - removed 2 cups warm milk stirred into it, 1/2 cup plain yogurt (this is the starter), stirred that back into the crock pot, wrapped two big towels around the pot and let it sit on the counter for 8 hours.

9pm - lined a strainer with coffee filters and balanced it inside a bowl then poured the thickened (but still runny yogurt in) and put it all in the fridge, left it over night.


7:30am - next day used a ladle to scoop off 4 cups of rather thin yogurt, added vanilla a brown sugar and stored that in the fridge (it lasted until about noon - the kids loved it).
Scraped the thicker cream cheese like portion into a bowl (about 1 1/2 cups) used part of that for cream cheese brownies.


Cream cheese brownies with the cream mixed in rather than swirled in, that's what happens if you change pans mid-way, still oh so yummy.

I had about 3 cups of whey (the yellow liquid that drains out of your yogurt left and I didn't want to just throw it away so after a few google searches I got the idea that I could use it in bread.
liquid whey (I used the other 2 cups in bread)


 I substituted it for all of the water in one of my favorite bread recipes.  It has a slightly sour taste (not as strong as sour dough but nice) and with the added protein from the whey (great for sneaking some protein into my kids).

Thursday, November 10, 2011

Apple Butter in a slow cooker

We were lucky enough to receive a large bag of apples from a friend.  My kids love apples so this was a really nice treat but it got me thinking what do you do if you have a lot of apples?  (I dream of my own fruit trees but .  . . I haven't done anything to make it happen and considering our track record with keeping trees alive I think I'd have to do quite a bit).

Well I decided since we have extras and I wasn't feeling the desire to dry them, I'd try something new.  I've never tasted or even seen apple butter but the recipes I found on-line sounded yummy so that was it.

I combined several recipes and brought in my neighbor who cans for a quick consult.  The result was a house that smelled great all day and a treat that everyone enjoyed.

Recipe

about 6 lbs of tart yellow apples (the different recipes suggested a mix of types of apples, I think the key is adjusting your sugar levels)
3 cups of sugar (plus or minus for taste or depending on tartness of the apples)
2 tsp. ground cinnamon
1/4 tsp ground cloves
1/4 tsp salt


I peeled, cored and chopped the apples and put them in my large slow cooker (5 1/2 to 7qt)  but several recipes just cored and chopped them (more fiber and probably would thicken better due to the pectin in the apple skins).
Mix the dry ingredients and stir into the apples.
Cook on high for one hour
Using a stick blender I blended the mixture up after one hour and again near the end.
After one hour on high I cooked it for another 5 hours on low, stirring occasionally but other recipes suggested 9 - 10 hours or overnight.
Then UNCOVERED on high for an hour (to decrease the liquid and make it more the consistency of peanut butter.


Ours was a little bit more jam like but I think that will be easier for small people to spread.
I canned 5 small jars in a water bath and we ate the leftovers.

printable recipe

Wednesday, October 19, 2011

Cake Donuts


3 1/3 c flour 2 eggs

½ tsp salt 1 c sugar

2 Tbsp shortening ½ tsp cinnamon

2 tsp baking powder ¾ c milk

¼ tsp nutmeg

Heat 3 – 4 inches of oil to 375 degrees. Add 1 ½ c flour and other ingredients in a lg bowl. Blend for ½ min. on low. Scrape bowl well, blend for 2 more minutes at med. Add remaining flour. Mix. Roll out on a floured surface to 3/8-in. Thick. Cut Fry tor 2 – 3 minutes on each side, until golden brown. Frost when cool.


printable recipe

Tuesday, October 11, 2011

Quick Italian Soup

2 Tbsp. Butter
1 Tbsp. Dried onion
1 small head cabbage, diced (about 6 cups)
2 (15 oz,) cans mixed vegetables, un-drained
2 (14.5 oz) cans Italian stewed tomatoes
optional: cooked sausage, 1 can tomato paste, kidney beans

saute onions in butter in large saucepan over medium heat, add cabbage to wilt, stir in mixed veggies, tomatoes and one can of water

Sunday, August 21, 2011

Green Souce HOT!

Got Peppers?  Years ago I got this recipe from a co-worker, I love it, although I admit to reducing the amount of Serrano peppers (A LOT), it has such a fresh garden taste.  We like it with chips but I think it would be yummy on enchiladas or taco too.  I hope you enjoy it.


2 lbs. Tomatillos 1 med. onion, diced

1/2 to 1 lb. Serrano peppers 14 cloves garlic (I use the bottled)

2 – 3 qt. Water 1 tsp. black pepper

4 Tbsp. salt 1/2 tsp. ground cumin

3/4 cup vinegar 1 Tbsp. ground oregano

Boil, Tomatillo, Serrano and water mixture until the peppers are limp. Mix garlic, onion, pepper, cumin and oregano. Combine all ingredients in a blender. Blend until the sauce is smooth. Store in the refrigerator.

printable recipe

Monday, August 15, 2011

Milkshake from food storage!?? And it's good!

I'm posting this for Erica who wanted the Frosty recipe but also because it combines two things I love, the taste of a Wendy's frosty and the chance to use my food storage so I can keep it rotating.  It's really good too, I 've made it as directed and with variations. I've included the whole post from the Hillbilly Housewife so that you can see the rational behind using oil and non-stick spray as well as some yummy variations to try.

1-1/2 to 2 cups ice water
1-1/2 cups nonfat dry milk powder
2/3 cup sugar
1/4 cup unsweetened cocoa
1 teaspoon vanilla
1 to 1-1/2 trays of ice cubes, to fill blender 3/4 full
2 tablespoons corn oil plus a 5-second squirt of non-stick spray for emulsification purposes


Place all of the ingredients into the blender, including the oil and the non-stick spray. Use less water for thicker milk shakes and more water for shakes that are easy on your blender motor. The blender should be about 3/4′s full. Place the lid on. Process for a full 2 minutes. Pour into cups and serve. Makes 4 – 12oz servings.

printable recipe

For preparation tips please see below.
I love this recipe because it makes very rich milk shakes without any ice cream. I don’t always have ice cream in the house because the kids eat it so fast. With this recipe we can have delicious frosty milk shakes for a fraction of the cost of those using ice cream. And all the ingredients are on the pantry shelf.
Reader’s Tip: A reader named Chris made these with Splenda replacing the sugar measure for measure and said they turned out perfectly. If you like Splenda, then this tip would be a great way to reduce the calories and make them sugar-free. Thanks for sharing Chris!
Variations:
  • Add 1 tablespoon of instant coffee for a mocha shake
  • Add 1 very ripe banana for a chocolate banana shake
  • Add a big spoonful of peanut butter for a decadent Chocolate Peanut Butter Shake.
  • Add a few broken red and white candy mints for a refreshing Chocolate Mint shake.
  • To make Vanilla Milk Shakes, omit the cocoa powder, reduce the sugar to 1/2-cup and add 1 tablespoon (yes a full tablespoon) of vanilla flavoring. For a french vanilla milk shake crack in an egg too.
A few tips and a long rant:


I get more email about this recipe than I do about almost anything else. The people who love it always add the oil and the nonstick spray. The people who hate it seem to think they can get by without these ingredients. Let me make things clear. Fat makes things creamy. It may seem weird to add vegetable oil to a beverage, but manufacturers do it all the time. Coffee creamer has oil and shortening it. Fancy coffee mixes and hot cocoa mixes have oil and shortening added. Whipped topping and many ice creams have added vegetable fats. Read the labels if you don’t believe me. Dairy fat tends to go rancid when it is dried so it is seldom used in commercial products. Instead food manufacturers use vegetable fats, usually of the hydrogenated variety. They are cheaper than dairy fats, don’t require refrigeration, and are easier to use.
Fat is added to foods for many different reasons. For this recipe it acts as a flavor carrier and adds richness and depth to the texture and flavor of the finished shake. Oil is the ingredient that makes your milk shakes thick and creamy. If you make it without any added fat you will not get a milk shake that resembles Wendy’s Frosties. You will get chocolate ice. Chocolate ice is nice, but it isn’t a rich, creamy Frosty.
Think about how creamy mayonnaise is. It’s 99% vegetable oil. All of that creaminess comes from mixing oil with a small amount of vinegar and an emulsifier (eggs in the case of mayo). Then it’s all whipped to creamy perfection. To make your milk shakes creamy you need to emulsify the milk and the oil, the same way the oil and vinegar must be emulsified for mayonnaise. To emulsify something is to mix it up really well, so the particles won’t separate on standing.
Nonstick spray contains liquid lecithin as it’s active ingredient. Lecithin is found in eggs and in soybeans, both of which are natural emulsifiers. You can buy liquid lecithin at your local health food store or online from natural food resources. If you liked, you could use 1/2-teaspoon of liquid lecithin instead of the nonstick spray. Most folks don’t have liquid lecithin laying about the house though, so I give you the option of using nonstick spray instead.
Liquid lecithin is derived from soybeans. It is a fat; a healthy fat. When manufacturers discovered that liquid lecithin has nonstick properties they put it in a can with a propellent and thus invented nonstick spray. Before manufacturers discovered this, old hippies and health food freaks were using lecithin to grease their baking pans and adding it to salad dressings so they would stay mixed longer. Today, some vegans use liquid lecithin as an egg substitute in baking. Most store-bought chocolates and salad dressings have liquid lecithin added to give them the creamy satiny quality that we all look for in these products.
Which brings us back to this recipe. If you want a luscious, satisfying milk shake then follow the recipe and add the oil and the nonstick spray as directed above.

Thursday, May 19, 2011

Quick Mix and recipes to go with it

One way to save a little money (and time) is to make your own mixes.  I've had these recipes floating around for awhile so I'm sorry I can't give credit to their original source.

QUICK MIX

8 ½ c. all-purpose flour
4 T. baking powder
1 T. salt
2 T. cream of tartar
1 t. baking soda
1 ½ c. instant nonfat dry milk or buttermilk powder
2 ¼ c. vegetable shortening

In a lg. bowl, sift together all dry ingredients.  Blend well. With a pastry blender or heavy-duty mixer, cut in shortening until mixture resembles cornmeal in texture.  Put in an airtight container.  Label with date and contents.  Store in a cool, dry place.  Use within 10 to 12 weeks.  Makes about 13 cups

CRISPY BREADSTICKS

2 c. QUICK MIX
½ c. cornmeal or flour
½ t. salt
about ½ c. milk or water
Sesame, caraway or poppy seeds, if desired.

Preheat oven to 400F.  Lightly grease baking sheet.  Combine QUICK MIX, cornmeal or flour and salt.  Add milk or water to form dough.  Knead about 12 time, until dough is smooth.  Divide into 12 balls and shape into pencil-like strands ½ inch thick.  Roll in seeds, if desired.  Bake about 20 minutes, until brown and crisp.

SUNSHINE COFFEE CAKE

3 c. QUICK MIX
1/3 c. sugar
1 egg, slightly beaten
1 c. milk or water
1 t. vanilla extract
Cinnamon Crumble Topping

Preheat oven to 350F.  Spray and 8-inch pan with vegetable cooking spray.  Combine QUICK MIX and sugar until evenly distributed.  In a small bowl, combine egg, milk or water and vanilla. Stir until just blended.  Prepare Cinnamon Crumble Topping.  Spread half the batter in the prepared pan.  Spread half of the topping over the batter.  Top with remaining batter and topping.  Bake 40 – 50 min.


Cinnamon Crumble Topping

1/3 c. flour
½ c. dry breadcrumbs or cookie or cake crumbs
½ c. brown sugar, packed
1 t. ground cinnamon
¼ c. butter or margarine

Combine flour, crumbs, brown sugar and cinnamon.  With a pastry blender or fork, cut in butter or margarine until crumbly.

BISCUITS

3 c. QUICK MIX
¾ c. water or milk

Preheat oven to 450F.  Grease a baking sheet.  Combine QUICK MIX and milk or water in a medium bowl.  Stir until just blended.  Drop dough by tablespoonfuls into prepared baking sheet.  Bake 10 to 12 min, until golden brown.  Makes 12 lg. drop biscuits.

Variations

Cheese and Herb Biscuits – Add 1/3 cups grated Cheddar cheese and chopped parsley, chives or herbs to taste while stirring dough.

Buttermilk Biscuits – Substitute ¾ c. buttermilk for milk or water.

Orange Biscuits – Add 1 T. grated orange peel.  If desired, substitute 2 T. orange juice for par of water or milk.

Fruit Cobbler – Spoon dough over top of hot, sweetened fruit or berries and bake in an 8-inch-square pan about 20 to 25 minutes until golden brown.

QUICK PANCAKES

2 ¼ c. QUICK MIX
1 T. sugar
1 egg, beaten
1 ½ c. milk or water
Combine QUICK MIX and sugar.  Mix well.  Combine egg, and milk or water in a small bowl.  Add all at once to dry ingredients.  Blend well.  Let stand 5 to 10 minutes.  Cook on hot, oiled griddle 3 to 4 minutes, until browned on both sides.  Make 10 to 12 4-inch pancakes

Thursday, April 14, 2011

Chocolate Cake without eggs

I store flour (and wheat and a grinder), sugar, baking powder, baking sugar, salt, vanilla, cornstarch, vinegar,etc. We even have chickens but since they aren't always reliable (especially in the winter) I thought I'd try this recipe.  It's very similar (if not the same as)  one my mom makes.
Grease WELL a 9 x 13 in. pan, preheat oven to 350 degree F.

Mix dry ingredients.
3 cups flour
2 tsp. baking soda
1 tsp. salt
2 cups sugar
1/2 cup cocoa
Add in:
2 Tbsp. vinegar
2 tsp. vanilla
2/3 cup oil
2 cups of water or milk (or reconstituted milk)

Pour into greased pan.

Bake for 40 minutes or until done.

printable recipe

At this blog I found lots of different uses for powdered milk, besides just reconstituting it.

Using powdered milk from Hillbilly Housewife 

Thursday, April 7, 2011

Canning Chicken

I'm on a food storage kick at the moment. The desire to fanatically grocery shop comes and goes for me.


Recently while visiting teaching the topic of canning came up and after discussing all the things that could be canned I ended up coming home with a bottle of chili that the sister we were visiting had just made and a fierce (yes fierce) desire to own a pressure cooker. Later that week I ordered one on-line from
Walmart, this wasn't really the snap decision it sounds like because I'd been thinking about getting one for about a year now. I decided to go the less expensive route by buying the Presto 23 qt. instead of one like the All-American with it's metal to metal seal. I knew I wanted to buy the big one because faster is always better in my book. I ended up buying new - just because. I also bought a bunch of new pint jars with the wide mouth lid and 40lbs of chicken from Kents when it was .99 cents a pound.


When the canner arrived (I order site to store so that I didn't have to pay shipping and it came about 5 days before they said it would) I started canning. I've finished 32 pints of chicken. We love chicken salad so that should last for a few weeks. Today I was checking some prices on-line and found this blog where she had compared the price of Costco canned chicken to home canned. Wow I was impressed. I figure that for this first bunch I payed 4.32 a jar but that includes everything including the $80 canner and new jars, the more things I can the less that will be.

4/25/11
I've decided to add a little description of exactly what I did just in case you have questions.

First I have a Presto 23 quart Pressure Canner and Cooker which means I can use it to pressure can food into bottles as well as cook large quantities of food quickly.
The first thing I do when canning is check to make sure the vent pipe is clear (just by looking through or running a pipe cleaner or wire through. And check the canners rubber seal to make sure it's not cracked or looking off in any way).   Then I get out my jars, lids and rings.  I used 16 wide mouthed pint jars.  This time they were Kerr jars but I don't have a preference.  Just make sure they have no cracks or nicks, you don't want to go to all this work and have a jar crack or not seal.
I put the jars and rings in the dishwashers both so they are clean and so they are hot when I'm ready to use them.  I put the lids in a pan of water and heat them up to sanitize them and to soften the seal.  (NOT too hot for too long because they smell really bad if you run out of water - yuck!) - Boiling for 2 minutes is good.
Next I added 3 quarts of water and 2 Tbsp of plain white vinegar (to help keep the canner from staining) and the rack.  That's basically 3 inches of water in my canner.   MAKE sure you are using the direction for your canner.  Then I put the canner on the stove to start heating the water.
When using chicken tenders I started this right when I got them out of the fridge, when I canned breasts I started cutting up the meat first.  Some directions I've read say you should cut the chicken into 1 inch pieces I just made it small enough to fit in the jars, and I crammed it in there.  I did add hot water to fill it to the lowest ring but I didn't add salt.  My recipe book says that if you add salt you should use canning salt to avoid cloudiness at the bottom of your jars????   You can add 1/2 a tsp. per jar.  I did not precook the chicken, although my Presto recipe book said to, what can I say I went with the directions from food storage experts who do a lot of canning that I found on the web, and tips from a friend who actually cans a lot of chicken.   (long sentence sorry)
After adding the chicken, water and salt (I don't think you actually have to add water to raw meat but I did) I wiped off the top of the jars put the flat lid (rubber seal side down) on the jar and tightened the rings on.  Then I stacked them in the canner.  My canner allows for two rows of pints, if you are doing this just remember not to stack them right on top of each other, overlap them a little.
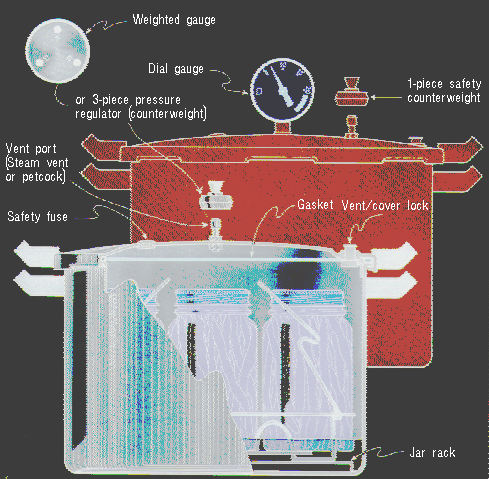
Lock the lid on but DO NOT put the pressure regulator on the vent pipe (in the picture above this is called  one piece safety counterweight).  Heat water at a high temperature to exhaust air from the canner, when you have a free flow of steam from the vent pipe let it steam for 10 minutes.  NOW you put the pressure regulator on the vent pipe.  FOLLOW THE DIRECTIONS FOR YOUR CANNER.  Canners are different there are pressure gauges and rockers, rubber seals and metal to metal seals.  It's so important to read the directions for the canner you are using.   If you are missing the directions for your canner check out this website for a link to different manuals.  Just click on the colored text. http://www.pickyourown.org/pressurecanners.htm
Now that you have the pressure regulator on the vent pipe you need to wait until the pressure gauge (called a dial gauge in the picture above) reaches your desired psi (pounds per square inch) or pressure.  For chicken at our elevation (Utah) I used 14 lbs.    Once it reached 14psi I set my timer for 75 minutes (for pints) 90 minutes for quarts and waited.  I kept an eye on the stove to make sure the pressure stayed constant at 14.  Every once and awhile I would adjust the heat a bit.
When the time is up turn off the heat (if you can lift it remove the canner from the hot burner - sliding might not be a good idea for your burner) and WALK AWAY.  You CAN NOT hurry this part just let it cool until the pressure reaches 0 and the air vent cover has dropped.  Then remove the pressure regulator and let it cool another 10 minutes.  The steam inside this thing is VERY hot you don't want to do something silly like popping off one of those safety valves unless of course you really like cleaning the ceiling of your kitchen and don't mind scalding smelly water / steam / vapor raining down on you.
Even at the end you want to open the lid away from you just in case.

Remove the jars from the canner wipe them off, label them and enjoy.

It made a nice tender chicken with out that kind of tuna fishy metal taste that some canned chicken has.  It does look a little strange though (like canned chicken) just use a fork to mush it up and it looks much better.


originally posted at The Homestead on  May 18, 2010

Homemade Yogurt

So my kids LOOOOVE yogurt and smoothies and messes (but that's another story).  I've been using coupons and buying on sale but still it gets expensive because if I let them, they will eat it all (no matter how much I buy) in a day.  So when I saw this post on making yogurt in your slow cooker on one of my favorite blogs A Year of Slow Cooking  I had to try it and yippee it worked!

Naturally I didn't follow the directions exactly but that's kind of life around this house.  We improvise a lot.  I used 1/2 a gallon of 2 % milk and put it in my smaller crock pot (3 1/2 qt).  With the lid on (duh) I let it cook on low for 2 hrs and 45 minutes.  Then I unplugged it and let it cool for 3 hours.  I started later than I planned and so by now it was 11pm :(, fortunately the rest was easy.  I removed 2 cups of the milk from the pot  mixed it with 1/2 a cup of plain yogurt (I used Yoplait all natural plain because that was the cheapest when I went shopping).  Then I poured that mixture back into the crock pot (or slow cooker whatever you want to call it.  Is there a difference?).
A little bit of whisking to get it all mixed in and then I wrapped the whole pot up in two thick towels and let it sit (still unplugged) over night.  Actually it sat until about 10 am because it was a crazy morning but then we ate it or rather drank it  (it was very liquid - there are things you can do about that but it worked great for us that way so I didn't bother).

We made smoothies with sugar or brown sugar or honey (we tried them all) a little vanilla and blueberries or bananas (Coltrin would not drink the blue drink).  I add some ice at first to thicken it and well . . . . because it was warm.

I also used it in oatmeal cookies (I substituted 1/2 the butter with plain yogurt) and except for the ones I burned - oops it made a really yummy slightly more chewy cookie.  I used it it Irish soda bread (I substituted it for the buttermilk) and while I'd never made it before so I don't know how much it changed the taste it was good.  I'm definitely going to make it again. (The yogurt that is and maybe the bread, it looked cool and reminded me of the baking powder biscuits we always had when I was growing up).  The yogurt was a money saver and a great substitute.  Next on the menu Parmesan chicken dipped in what else yogurt.

Some interesting facts from the people at Mountain High Yogurt

Plain yogurt can be substituted one-to-one for sour cream, mayonnaise, cream cheese, cream, butter, or milk in:

  • dips
  • spreads
  • sauces and marinades
  • cream soups
  • tuna, pasta, potato, and fruit salads
  • salad dressings
  • mashed potatoes and other potato dishes
  • casseroles
  • baked goods
  • desserts

and used as a topping for:
  • appetizers and canapes
  • baked potatoes
  • soups
  • casseroles
  • tacos, burritos, and other Mexican dishes
add a little vanilla (and maybe sugar, to use as a topping for):
  • cakes
  • pies
  • puddings
  • desserts
  • fruit
  • parfaits
  • trifles
  • waffles
  • crepes
  •  
    originally posted at The Homestead on March 23, 2011

Friday, March 4, 2011

Homemade Laundry Soap

Here's a good link to making your own laundry soap. I've tried this and while mine turned out kind of lumpy, it smelled nice and the clothes seemed to be just as clean (and maybe cleaner looking because of the Oxy Clean I added).

This is the recipe I used, the linked post is a little bit different but it was so descriptive I thought it would be good to share.

1/2 bar of grated laundry soap, I used Fels Naptha which I got at Fresh Market (but I've heard it or Zote can be found at the dollar store) - edit - today I found Zote for 97 cents at the Walmart in Layton
1 cup Arm and Hammer Washing soda (I just used a couple of big scoops of Oxy Clean because I had it and love it)
1/2 cup Borax

I'm not going to type the directions because the link was so descriptive, with lots of pictures (maybe yours will turn out better than mine).

Here's that link again. Homemade Laundry Soap at The Simple Dollar